Wednesday, February 24, 2021

Trunk Stability and Athletic Performance


by Chris Wong, PT, DPT


Most of us have experienced debilitating back pain in our lives that have hampered our ability to train for our respective sports or even to carry on with our normal activities of daily living. Low back pain is a leading cause for a lot of athletes to stop training and doing what they love.

My first encounter with low back pain happened after an Easter egg hunt at a local park when I was in high school. I saw that an egg was placed on top of a gazebo and thought to myself, "I could totally get that." I proceeded to climb onto a BBQ grill and made the leap to grab the egg. I did indeed achieve my goal but got clotheslined by the side of the gazebo, falling about nine feet straight down onto my right hip.

For many years after that incident, I attempted to rehab my back with variations of sit-ups and crunches, thinking that a "strong core" would help. It didn't. (McGill SM, 1995) Finally, I changed my training style. I am now free of back pain and feeling stronger than ever.

So what changed?

Trunk stability. The "core" of our body is comprised of numerous muscles that span multiple joints and levels of our spine, much like an orchestra that requires several musicians to coordinate together to create a symphony. When you train your core, exercises like sit-ups and crunches may not be addressing all the muscles that are being required to help provide stability to the core. A strong core does not just mean having a ripped 6-pack, but it requires an athlete to have the ability to have numerous muscles co-contract together to help improve performance and reduce the risk of injuries.

When the core muscles fail to meet the stability demands during a movement, parts of the spine are overloaded with forces, leading to an increased risk of injury and potentially decreased performance. (Kibler WB, et al, 2006) The idea of a radio tower as a spine's structure is presented by Dr. Stuart McGill, a leading researcher in the mechanics of low back injuries. Dr. McGill notes that a radio tower must be supported by guy wires from multiple angles to help keep it upright, much like our connective tissues and muscles that must work together to help facilitate bracing, twisting, extension, and flexion.

Isometric training helps enhance muscular endurance and coordination. (Lee BC, et al, 2015) Research has found that isometric exercises are far superior when compared to dynamic strengthening in enhancing spinal stiffness and stability, making them ideal not only for rehabilitation but for athletic performance also. When every muscle surrounding the spine can co-contract together, it creates a natural weightlifting belt. 

Here are four simple, yet effective exercises you can try now:

1) Plank

  • Place forearms on the floor with elbows aligned below shoulders and arms parallel to your body
  • Push into the floor with your toes and squeeze your glutes to stabilize your body
  • Hold the plank position for as long as you can comfortably without compromising your form
  • Try seeing if you can complete a 30-second plank

Plank


2) Side Plank

  • Start on your side with your feet together and one forearm below your shoulder
  • Engage your core and lift your hips until your body make a straight line from head to feet
  • Hold the position without letting your hips drop. Repeat on the other side
  • Try seeing if you can complete a 30-second side plank

Side Plank


3) Bird Dog

  • Begin on all fours with your hands under your shoulders and knees under your hips
  • Keeping your back and pelvis stable, reach your right arm forward and left leg back
  • Try not to let your pelvis and body rock side-to-side during the movement
  • Return to the starting position and complete multiple repetitions, then switch with the opposite arm and leg
  • Try seeing if you can complete a set of 10 repetitions on each side


Bird Dog


4) Isometric Banded Step Out with Press

  • Get a band or cable anchored below shoulder height
  • While standing perpendicular to the anchor and holding the handle with both hands, press your arms forward away from your chest until your elbows are fully straight
  • Step out as you build tension and hold your position, keeping your hips and shoulders squared facing forward
  • Repeat on the other side
  • Try holding an isometric banded step out with a press for a 30-second hold on each side

Isometric Banded Step Out with Press


Chris Wong is a physical therapist from the Los Angeles area. He has worked with the USA Volleyball and USA Weightlifting National teams. He is currently working with elite amateur and professional combat athletes. Chris can be found on Instagram @chrisdwong.

---

References

  1. Kibler WB, Press J, Sciascia A. The role of core stability in athletic function. Sports Med. 2006;36(3):89-98. 
  2. Lee BC, McGill SM. Effect of long-term isometric training on core/torso stiffness. JSCR. 2015;29(6):1515-1526.
  3. McGill SM. The mechanics of torso flexion; sit-ups and standing dynamic flexion maneuvers. Clinical Biomechanics. 1995;184-192.


Wednesday, November 25, 2020

THANK YOU from Team Movement Links


Hello to our Movement Links family around the globe! Tomorrow is Thanksgiving Day here in the US.  We, in the US, thought it fitting to take a step back and thank each of you, whose desire is to make our patients and clients’ lives better. 


Like all of you, this year has been pretty wild for us. We are a company that is based around in-person & heavily hands-on courses. With the inability to gather together in the early part of this year, we had to re-group and re-set our plans.  We know that so many of you had to do the same. 

Through all the losses of every kind, the uncertainty, the fear, and the ever-changing landscape around us, we thank you for sticking by us and for supporting us.

Our mission to empower ourselves and our patients through MOVEMENT is alive and well. 

Here’s what we’re up to these days.  

  • The space and time afforded by the pandemic allowed us to create an updated video library with expanded exercises based on the fundamentals taught in the ML courses.
  • After careful planning and attention to safety, we were able to return earlier this fall to limited in-person classes that we’re hopeful can continue. 
  • Tentative planning for 2021 course offerings is underway.

We invite you to stay connected with us through our social media platforms, reach out with questions, ideas, feedback, and for those who celebrate, have a Happy & safe Thanksgiving!

Stay safe and healthy,
The Movement Links Team

Tuesday, July 28, 2020

4 Things I Wish I Knew About Adults with Scoliosis Back In 2012

By Kelly Grimes, DPT, GCS, OCS 

Somewhere as 2012 became 2013, I dipped my toes in what Ill call The Lake of Scoliosis. Soon after, I dove all the way in, started splashing around, and have never fully emerged. Id long been fascinated by the spine in all its wonder, and in particular, asymmetries of the spine. Id wonder about side-to-side differences when Id reach the alignment segment of the objective exam. I could see some nuances, but couldnt take my clinical reasoning process any further.


Eight years later, Im still floating around, although Ive ventured to different lakes, streams, waterfalls along the way. The adventure continues and there is still much to be explored.


But for now, these are 4 things I wish I knew about adult scoliosis back when all I had under my belt was the one hour of scoliosis education from physio school (insert stick figure draped sideways over a physioball with the words stretch on one side of the trunk, and strengthen on the other side of the trunk).


1) THERE ARE DIFFERENT TYPES OF ADULT SCOLIOSIS


This distinction will come up in the subjective portion of the exam if scoliosis is part of your clients main concern, or it will come up during the objective as the spine differences come to light.


If there is already a recognition by the client that theres scoliosis and it is part of the clients chief concern, the follow-up question will be, At what point in life did you or anyone close to you recognize that there was a side-to-side difference in your spine?


If the client clearly remembers the discovery being made during childhood or adolescence, they have adolescent idiopathic scoliosis and are now an adult. (1) We can then explore further how their scoliosis was managed at the time and throughout their lives up to this point. 


If the client says something like, I started noticing it about 3 years ago when looking in the mirror or My partner says she noticed it in the last 10 years when she would walk behind me and see me tilting to one side a bit, you can make the prediction that they have whats called de novo scoliosis or adult-onset scoliosis. (1) This means that the spine variation came about after skeletal maturity.


How does this affect clinical decision making? First, it affects the clients story and their story affects our collaboration. Adults with scoliosis that came about during childhood/adolescence may have a different way in which theyve integrated scoliosis into their life narrative. This integration runs the gamut, from full acceptance, to varying levels of satisfaction with appearance, to a broad spectrum of belief about how scoliosis affects their musculoskeletal and movement system as a whole. Like any patient, better understanding our clients beliefs and perspectives can help create a richer process.  Adults with a more recent discovery of scoliosis may present with a different perspective, a different narrative. For some, it can be alarming to recognize at some point in life the development of an asymmetry. There may be a level of fear and anxiety surrounding the change in the spine. For others, the information is accepted matter-of-factly and immediately leads to, What can I do to help myself?


2) SIZE OF COBB ANGLE DOES NOT CORRELATE WITH MAGNITUDE OF PAIN


Just like structure does not equal pain for any other tissue issue we treat in the movement world, the magnitude of the curve we see clinically and on radiographs does not mean that the individual were measuring is that amount likely to experience pain. (2) In the same way that I have a client with a full rotator cuff tear able to do pushups and lift weight overhead largely without pain, I have a client with negative imaging who is unable to perform these functions due to pain. Similarly, I have clients with curve magnitudes upwards of 70 degrees running several times/week in Central Park, and then also have clients with 28 degree curve experiencing a lot of pain.


If Cobb angle is not the end-all/be-all, there are a few markers that come from the world of orthopedic surgery, that can be helpful to us non-operative movement professionals.


3) PAY ATTENTION TO THAT PLUMBLINE


You know the good ol plumbline that I for sure memorized in physio school.


Side view

Back view

Slightly posterior to apex of the coronal suture

Through external auditory meatus

Through the odontoid process of axis

Midway through shoulder

Through lumbar vertebral bodies

Through sacral promontory

Slightly posterior to center of hip joint

Slightly anterior to axis of knee joint

Slightly anterior to lateral malleolus

Through calcaneocuboid joint

Midline of skull

Midline of sternum and spine

Midline of pelvis

Midway between lower extremities

Midway between heels


Table 1: Ideal Plumb Alignment (3)


What orthopedic surgeons have taught us over the last decades about adults with scoliosis is that though we can live well with some variation in sagittal (side view) and frontal (front/back view) alignment, there is a seeming point of no return.


From the side view, its best for C7 to stay as lined up with the posterior superior sacral base as possible.  If the spine variation changes the side alignment to the point where the cervicothoracic junction and shoulders migrate too far forward in relation to the pelvis, the energy demand on the musculature of the entire kinetic chain to stay upright shoots way up, and quality of life issues often ensue. It’s called anterior sagittal imbalance. (4)


From the front/back view, if C7 ventures to far to the right/left in relation to the gluteal cleft (or, butt crack, as it was called in my upbringing?), it also increases the demand on active and passive structures to maintain healthy center of mass.


The true reference values come from radiographic measures where a full-spine x-ray is needed.


Sagittal Vertical Axis (SVA) taken on a lateral full spine x-ray

Distance between:

- vertical line dropped from C7

- vertical line through posterosuperior sacral base


Problematic if C7 > 4cm anterior to sacrum (4)

Central Sacral Vertical Line (CSVL) taken via a full spine x-ray AP or PA view

Distance between:

- vertical line from C7

- vertical line from center of sacrum

Problematic if C7 is >3cm to either direction (right or left) in relation to sacrum (5)


Table 2: Radiographic reference values for SVA and C7-CSVL (4,5)


However, we can get a good gist clinically. Using the plumbline values as reference points, how do the parts stack up from the side view? How do they stack up from front/back views?


                                        Anterior Sagittal Imbalance      Coronal Imbalance

From there, try to ascertain how fixed the alignment is. Meaning, does the alignment change if the free-standing position is compared to a more unloaded position.


Examples of unloaded positions- in each position, ask How do the parts stack up?

- standing with back supported against wall (heels about 1-2 inches away from wall

- sitting supported and unsupported

- supine

- prone/quadruped


If the client is able across unloaded positions to come to a more centered alignment from the sagittal and frontal plane views, it shows theres the potential to modify. If not, the prognosis isnt going to be as great for exercise to be helpful.


4) STABILITY > MOBILITY


This part Ive learned the hard way. The client will feel compressed and tight. Their instinct will often be to want to hang from something, hang upside down, round, sidebend, and rotate the back to reduce the unpleasant sensations and experiences theyre having. Historically, me being the helpful person that I am, Ive gone with it. Ive let them. Theyre fine in the moment. Then, theres a latent effect of increased symptoms later. Darn it!


What was helpful for me to learn in the last 8 years was that often, adults with scoliosis of either type, but especially the de novo or adult-onset type scoliosis, have spondylolisthesis. A scary-sounding word, but simply stated, two adjacent vertebrae are not stacked on top of each other in a congruent manner. Beyond the sagittal plane spondylolisthesis that I learned about in physio school that often affects individuals who participated in activities requiring a lot of spine hyperextension, in adults with scoliosis, the spondylolisthesis happens across multiple planes. (2) At times, a client may have imaging that demonstrates spondylolisthesis in multiple adjacent vertebrae affecting all three planes (antero/retro-, latero-, rotatory). There are still plenty of ligaments, muscles and connective tissues holding the spine up quite well. However, the system must learn to control their systems to a higher level.


Low kneel//prone on knees for both stability and elongation in closed chain


For this reason, the safest, best route to take is to build (create) space within, in an active way.  The client is trained with a skilled clinician to create the proper amount of internal pressure and space for the task at hand and the healthiest coordination of the muscles around the trunk.  A good start is to work first in neutral spine, with the ribcage stacked as best as possible over the pelvis within the clients available capacity.


There we have it. Four concepts I wish my 2012-self had known about adults with scoliosis.


---

My training in scoliosis and adult scoliosis, in particular, comes from the following wonderful resources. Id highly recommend the coursework offered by these organizations.


Barcelona Scoliosis Physical Therapy School

Schroth Barcelona Institute

Medbridge Educational Course- Adult Scoliosis


---


Kelly Grimes (IG handle: @physio_kellyg) is a physiotherapist living and practicing with Columbia University Irving Medical Center in New York City. A California native, shes been living in the Big Apple for the past 5 years, where an opportunity showed up in 2015 to pursue her passion for bettering her understanding of scoliosis. An instructor for Movement Links from 2014 2020, Kelly has taken a step back from teaching while she pursues some personal dreams. She still helps with the ML Blog, social media accounts, and is an all-around through and through fan of Team Movement Links. xxoo


---


References:

1) Aebi M. The adult scoliosis. Eur Spine J. 2005;14:925-948.

2) Schwab F, Farcy JP, Bridwell K et al. A clinical impact classification of scoliosis in the adult. Spine. 2006;31(18):2109-2114.

3) Kendall FP, McCreary EK, Provance PG, et al. Muscles- Testing and Function with Posture and Pain, 5th Ed. Baltimore, MD: Lippincott Williams & Wilkins; 2005.

4) Schwab F, Ungar B, Blondel B, et al. Scoliosis Research Society- Schwab Adult Spinal Deformity Classification- A validation study. Spine. 2012;37(12)1077-1082.

5) Lowe T, Berven SH, Schwab FJ, et al. The SRS Classification for Adult Spinal Deformity- Building on the King/Moe and Lenke Classification Systems. Spine. 2006;31(19)S119-S125. 


Wednesday, June 24, 2020

Movement Links Faculty Experiences with Telehealth in the Era of COVID-19

by Jiten B. Bhatt, Francisco De La Cruz, Ernie Linares, and Nicole Lovett


Jiten B. Bhatt

 The onset of a worldwide pandemic has affected the lives of millions of people. Regarding healthcare, countries' systems have been pushed to the brink of collapse as various providers have worked feverishly on the front lines to save the lives of patients stricken with COVID 19. Being a healthcare provider, lots of changes have occurred in medicine; from the utilization of protective equipment, social distancing, and the incorporation of telehealth. In this blog, our faculty will share observations as to how our knowledge of functional movement exam skills has been of benefit during our telehealth sessions.

 In April, Medicare passed emergency measures allowing for the use of telehealth for physical and occupational therapists. Finding myself in a new space, I began the process of navigating a patient exam through telephone or video visits. How did this look for me? The subjective exam was very similar to what I encounter in person. The main difference was what wasn't perceived in a regular face to face session - body language and movement. Here, I felt I lacked being able to see certain mannerisms of how a patient would walk in, sit, or communicate. These non-verbal cues are valuable in gaining clues as to how the patient uses their body, but overall, a check and pass for the telehealth area. 

Concerning the objective exam, this is where my functional movement skills were invaluable. In assessing a shoulder pain patient, I realized I was going to be bypassing some of the critical elements of an exam I usually engage in - end feel, assessing muscle length, and looking at joint mobility. However, in working with my patient, I had enough subjective information to develop a primary hypothesis of subacromial pain syndrome. I had the patient perform some directed quick tests and was able to rule out a possible tear. The patient then performed a ROM exam, and I noted no signs of adhesive capsulitis. As a result, I was able to determine the source of her pain as possibly being subacromial, and the cause being restricted posterior structures length in the cuff or capsule  (through assessment of having scapula fixed at a wall, and having the patient move into horizontal adduction). With a clinical picture coming into better view, I was able to focus on providing some treatment options. 

How about other cases? They all couldn't have gone smoothly. For this, I will agree. I had a patient who had severe chronic back pain and didn't respond as well to the care I provided. To this end, I  asked the patient to come in for a closer look via an in-person visit. Another client with back pain improved rapidly with just 1-2 video visits using my movement skills to determine that he had an extension rotation syndrome. After education on bracing and improving quad and TFL length, the patient's low back symptoms reduced considerably. Overall, the utilization of my movement skills have been incredibly useful during the pandemic and will hopefully improve with more cases and adaptations without the use of my hands.


Francisco Dela Cruz

The sudden health crisis our country has experienced in the past few months has dramatically changed the way we practice as PTs.  
The tools that we had before to evaluate and treat patients in the clinic, such as manual therapy, modalities, tools for kinematics/kinetics analysis, has been sidelined for now.  Now, we are using our visual observation of static and dynamic posture/functional activities,  clinical reasoning/clinical patterns to connect the dots for our patients to provide the best possible treatment.  

My experiences with telehealth have mostly been positive.  My practice in outpatient orthopedics before the COVID pandemic primarily revolved around looking at movement patterns, static/dynamic postures, functional activities, assessing muscle length/strength, and muscle/joint palpation.  Treatments were based on inhibition/facilitation of specific muscles and exercises to improve muscle recruitment and movement patterns/functional activities.  

Fast-forward to the new norm for our healthcare as providers, "Telehealth".   As I reflect on the changes I had to make in the way I practice, I realized it wasn't as drastic as I thought.  I still look at movement patterns, static/dynamic postures, functional activities, and assessing muscle length/strength.  The main change now is no more muscle/joint assessment via palpation.  

I now evaluate muscle length/strength through functional activity. For example, I use sitting knee extension to assess ankle DF ROM, hamstring length, and L/S directional susceptibility to motion.  I will ask the patient to perform a squat to assess ankle DF ROM, knee/hip flexion AROM, quadriceps strength, foot/knee/hip movement pattern, etc.   Correcting movement patterns might require asking patients to look at a mirror for feedback or using their own hands to touch a muscle to facilitate it.  I think, when combined with sound clinical reasoning, I can still provide the best option for treatment, whether it's exercise or management strategies to allow for optimal tissue healing.   

Now, of course, there are challenges that I have also faced.    The two main obstacles are technology and giving instructions.  The clarity of the video visit is essential to optimize the analysis of visual information from the patient's movement.    The instructions have to be concise, and you might have to keep switching between internal vs external cueing to get the right movement pattern and muscle recruitment.   Overall, using the different movement science concepts of looking at movement patterns, static/dynamic postures, assessing muscle length/strength, facilitation of muscles has made a challenging transition to telehealth not as daunting.


Ernest Linares

Having a background in movement science has most definitely prepared me for the challenge of performing telemedicine.  I feel confident in what I can observe and functionally test; will give me the information necessary to create the best intervention or movement strategy for my patients. On reflection, the most important skill/tool that has helped me is knowing what "normal" movement looks like. The great part about that knowing normal is that I can then ask myself "So do you like what you see?" and then ask the patient "Can you fix it?" or "make it not hurt?" and observe what they do. For myself, this observation gives lots of information about the patients' body awareness which is paramount when one is trying to incorporate interventional movement strategies in a virtual environment. It helps me understand which verbal and visual cues my patient may need; in the absence of tactile cues. It has been a challenge to cover all facets of the patient encounter but at the same time a good form of stimulation to think differently and utilize our movement analysis skills to help link the movement to the possible impairment. I see it as a great opportunity to practice a most valuable skill. Keep practicing!

Nicole Lovett

At Kaiser Permanente, telehealth has become more popular in recent years. Our organization has used video visits through this pandemic as an option for a patient to receive evaluation and treatment for musculoskeletal pain. So far, I have found video visits to be quite useful. With my movement specialist background, I have to rely on my observation and movement analysis skills versus my hands-on skills. The new environment has challenged me to work on my external cueing. Overall, I have had a good experience and will continue to offer video visits to my patients as another option.


Jiten (“Jay”), Francisco, Ernest (“Ernie”), and Nicole, are Movement Links Instructors and hold various clinical specialist and senior roles in the department of physical therapy at Kaiser Permanente Medical Center in Southern California. They each will lead upcoming course series as we transition out of the tight restrictions of COVID-19. Follow along with us!

Wednesday, May 20, 2020

Proprioception: The Sixth Sense

By: Nicole Lovett, DPT, OCS

Source: www.livescience.com

Imagine walking across a room and without warning, the lights go out, and suddenly,  you fall down.  Or you reach into your pocket to grab a quarter and when you look down to see, your hand is empty.   What would life be like if you had to look down at your feet every time you took a step?  Luckily for most of us, this is not the case; we have the ability to sense where we are and where other things are as part of our 6th sense.  But in rare cases, there is the absence of proprioception, which can occur when a fetus is just developing.  The absence of proprioception occurs when a mutated gene makes the Piezo2 receptor non-functioning. The Piezo2 receptor is an important receptor that integrates mechanical and thermal cues in vertebra mechanoreceptors. (1)  Without it, an individual has no proprioception.  Separate from genetic factors, proprioception can be affected when someone suffers an ankle sprain, an ACL tear, an Achilles rupture, a lumbar muscle strain, or in someone who is afflicted with a neurological disorder.

What is Proprioception?

Proprioception, also called kinesthesia, is the body’s ability to sense its location, movements, and actions in space.   Proprioceptors are specialized nerves that facilitate neurological and physiological responses.    The proprioceptors are sensory and can be found in the inner ear, muscles, skin, joints, tendons, and other tissues.  This is how the brain receives information about the body’s position and to perform certain tasks like, catch a ball, reach for a glass out of the cupboard, or walk in the dark.

How do you test for Proprioception?

There are a variety of ways to test for proprioception. Some tests include:
-     Romberg Test
-     Field Sobriety Test
-     Thumb Finding Test
-     Sequential Finger Touching, or Distal Proprioception Test

Also, the Single-Leg Stance Balance Test with eyes closed would be appropriate to assess proprioception. (2)  These particular tests determine a patient’s ability to sense, move, and act or react. It is a safety-related issue that includes balance and awareness to determine treatment plans that will prevent potential injuries during day-to-day activities.

Single limb stance
 Simply stated, the single-leg stance balance tests for proprioception. With the patient’s eyes closed for 30 seconds, the individual must maintain his or her position for the duration.


Normative data
Age (years)         Eyes closed
20-49                  24-29 sec
50-59                  21 sec
60-69                  10 sec
70-79                  4 sec


How do you train Proprioception?

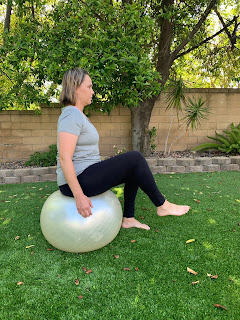
Once the assessment is complete and altered proprioception is detected, training is essential. When a soft tissue injury occurs, receptor activity is lost. With a loss of receptor activity, proprioception is affected. This is why that during the rehabilitation process, it is imperative to restore receptor activity.   This is done through proprioceptive training in order to re-activate the receptors in the soft tissues. To challenge the receptors one can vary the surface they are standing on or vary the speed of the task or multi-task.  Furthermore, there are three key areas of proprioception input, the cervical spine, pelvic girdle and the sole of the foot.  When training proprioception, pay close attention to alignment in these areas to better improve your outcomes. Improving proprioception will improve a patient’s motor skills, balance, and muscle strength.   Below are three exercises to focus on the three key areas: the sole of the foot, the pelvic girdle and the cervical spine.

Cone pickups on the grass to challenge the lower
extremity and sole of the foot


Deep cervical flexor swiss ball isometrics to challenge the cervical spine

Swiss ball marching to challenge the pelvic girdle


Nicole Lovett is a physical therapist working at Kaiser Permanente. She is a movement science fellowship graduate, Movement Links certified clinician and instructor, and has taught movement concepts in the Loma Linda Residency.
                                

References
---
1. Chesler AT, Szczot M, Bharucha-Goebel D, et al. The role of PIEZO2in human mechanosensation. N Engl J Med. 2016;375:1355-1364. DOI:10.1056/NEJMoa1602812.

2. Bohannon RW, Larkin PA, Cook AC, et al. Decrease in timed balance test scores with aging. Physical Therapy. 1984;(64)7:1067-1070.

Wednesday, April 15, 2020

F.M.P. (Yah you know me)

By David, Kurihara, DPT, OCS, SCS, FAAOMPT


One of the more challenging things we do as a clinicians involves our clinical reasoning and how it guides the prioritization of treatment.  In other words, making sense of the information we gather in our examination and implementing an effective and logical intervention plan. 

To this day, I still have cases where I fall off the track or get lost in the plethora of information.  When that happens, the picture becomes muddled and the case complexity automatically doubles. 

To keep me on the right path, I like to use a very useful tool adapted by Phil Page and Clare Frank called the Functional Management Progression (FMP).  I have it in my head constantly and it guides me in terms of progressing and prioritizing appropriate interventions. The pyramid is broken down into four main categories. 

1) Normalization of dysfunctional structures (base of pyramid)
2) Correction of muscle/movement balance (mid-bottom pyramid)
3) Increasing proprioception and facilitate subcortical pathways (mid-top pyramid)
4) Improving endurance in coordinated movement (top of pyramid)

*within each category are specific impairments

Functional Management Progression - adapted from Phil Page and Clare Frank


This is a powerful tool and there are many ways to utilize it.  For most cases, my personal preference is to use it like a ‘ladder’.  I will try to climb the pyramid all the way to the top where ‘skill/functional activity’ is sitting (which is usually the goal).   As I climb each level, I’ll try to address any impairment the patient might have within that specific level.  I usually won’t advance levels until the impairment at the current level is resolved.

This is especially helpful when you have what I like to call “impairment overload”.  It’s when you gather so much data in the subjective/objective exam that you don’t know what to do with it or where to start.  The easy way out is to have a “shotgun” approach to blindly treat every impairment.  That approach may sometimes produce results, however, there is no “progress control” and the reasoning of what helped or not is lacking.  It’s always nice to have a system in place. 


PATIENT EXAMPLE:

KEY SUBJECTIVE FINDINGS:

13 year-old female with chief complaints of:

1) Right lateral hip clicking/pain with every step x 4 years. Insidious onset.
2) Left anterior- posterior hip pain (“locking/weird feeling”) x 4 years. Insidious onset.  Has episodes every 1-2 months until 1 month ago got 3 episodes in a span of 2 weeks.  Symptoms occur with putting on pants, getting in/out of car, turning while feet planted.  Pain lasts 3 days. Plays judo and golf regularly for years.
.  
KEY OBJECTIVE FINDINGS: 

1) Posture: BL pes planus (functional), BL genu valgus, BL femoral IR (worse on left)
2) Gait: excessive femoral IR worse on right (with clicking laterally in left hip)
3) PROM: hyperflexible all joints (especially hips)
 4) Wobbly/incoordinated SL squat on left > right
 5) Golf swing: over-rotation with shoulder, trunk and hips
5) MMT: 3/5 (inhibited--poor initiation) BL glute max, ER and medius

IMPRESSION:

13 year-old female with BL hip pain secondary to multidirectional excessive mobility driven from inherent joint laxity and poor phasic muscle stability.

Day 1

It would have been fair (and obvious to most) to start strengthening her hips due to the glaring strength deficit.  However, using the FMP, I started on the bottom of the pyramid and opted to normalize her faulty posture and pain deficits (as much as possible). 


Posture re-ed: Neutral legs in standing (tripod foot position), sitting (no crossing legs), sleeping on side (pillow)


Postural Re-Education in standing, sitting, sleeping


Gait re-ed: Verbal cueing for reducing right femoral IR during gait resolved her right hip clicking


Gait Re-Education out of excess Femoral IR

Day 2

Patient experienced no clicking in the right hip with “mindful” hip position and no symptoms in left hip with putting on pants, twisting in closed chain or getting in/out of car.  Patient was “mindful” about centration of joints with sleeping, sitting, standing and walking and often catches herself in bad positions, but quickly re-corrects.

*** Addressing the static postural deficits proved to be helpful as she was standing, sitting and sleeping in poor positions and creating a ‘stretch weakness’ within her muscles and de-centration of joint position.  If that was not corrected, strengthening exercises may not have been as successful.

Furthermore, her words of being more “mindful” was a huge positive in that it told me that she was understanding the building blocks of motor control/awareness, which is a nice prerequisite for creating muscle balance.

Continuing to climb up the pyramid, there was no need to address her joint mobility or muscle length as she was hypermobile and flexible.  Those levels were skipped and we advanced to motor function/proprioception activities (with an overlapping of ‘muscle performance’).  I wanted to dial-up her “phasic” motor chain to increase stability in her joints.


Illustration of clinical reasoning using the FMP for Day 2

Brügger band squat, sidestep and leg opening, SL with TB


Top line: Brügger band squat// Bottom left: Brügger band sidestepping// Bottom middle: Brügger leg opening// Bottom right: Single leg stance with TB

*** The faster I can get a patient off the table, the better.  It would have been fine to start her in open chain exercises but it was a clinical decision I made to get her in closed chain immediately.  I felt that her motor awareness was excellent and the exercises we put her in could facilitate the right muscles even better than in open chain.

Day 3

Still no symptoms with all aggravating factors and able to return to full Judo and Golf without problems.  She liked the exercises as it helped her feel “good” in her legs.

We now arrived at the top of the pyramid and addressed the functional activities and skills she’d been doing regularly (judo/golf).  I could tell she felt a difference in her body with the exercises so I decided to advance her to a more functionally difficult regimen (specifically, dynamic single leg stability and closed chain hip rotation control to mimic judo and golf mechanics)

Illustration of clinical reasoning using the FMP for Day 3


SL squat with TB, SL airplanes


Left: Single leg Squat with TB// Right: Single Leg Airplanes


***.  We also tightened up her golf swing with leg and trunk positional cues to not over rotate (skill).


Again, you can utilize the pyramid to your liking based on your patient case or preferred way of thinking.  It’s probably better if you do, that way you know you’re thinking criticallyJ


David Kurihara is a board-certified specialist in Ortho­pedic Physical Therapy (OCS) and Sports Physical Therapy (SCS) and a fellow in the American Academy of Orthopedic Manual Physical Therapy (FAAOMPT).
He completed the Southern California Kaiser Permanente Orthopedic Residency Program in 2005, Manual Therapy Fellowship in 2006, Sports Residency in 2007 and Movement Science Fellowship in 2009.
David served on the clinical faculty for Kaiser Orthopedic Residency (2010-15), and Sports Fellowship (2008-15) and has been instructing various continuing education and residency classes since 2009. He currently resides in Honolulu and is part of Queen's Medical Center Sports Medicine team.